Articles are currently available in English.
Yoga
10-Minute Yoga at Home: No Kneeling or Floor Work
By Sweat & Snack · 2026-10-27
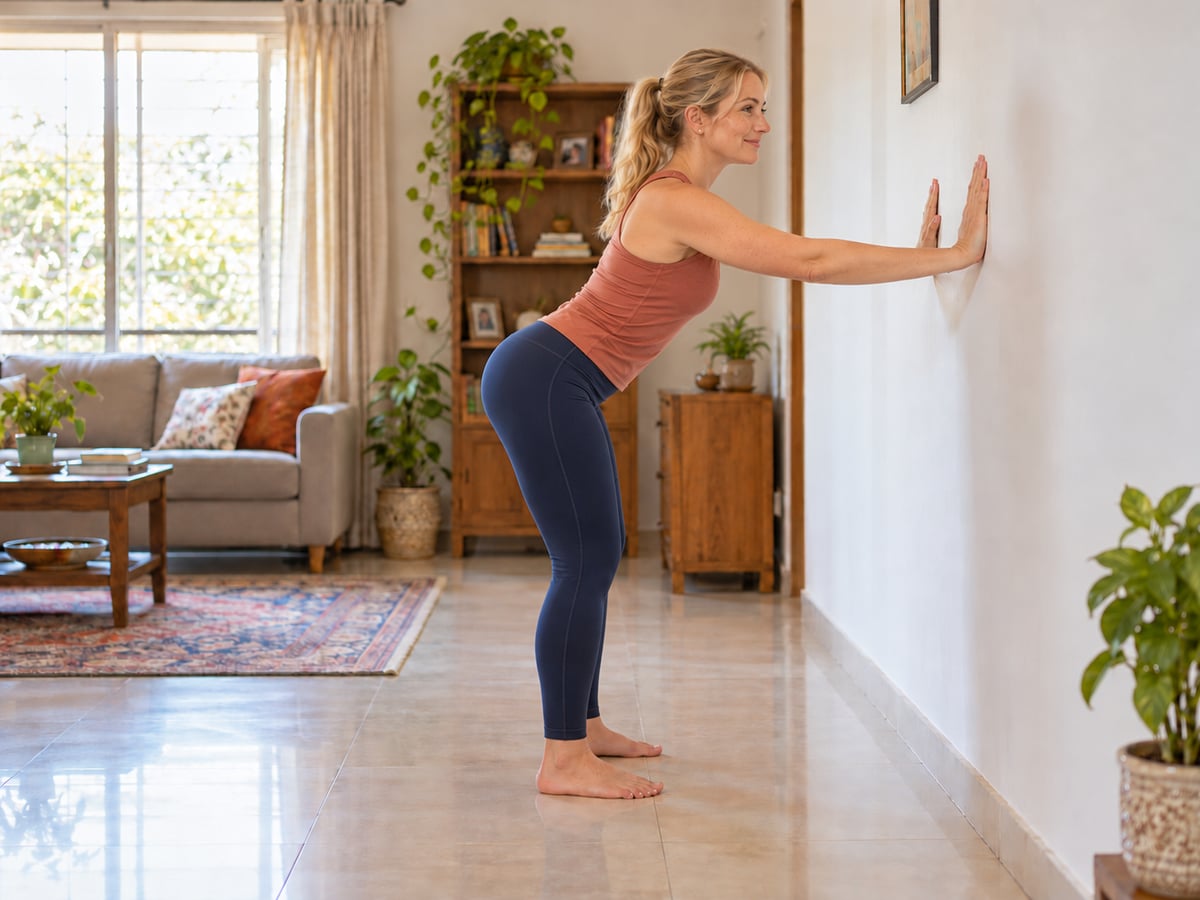
Want ten minutes of yoga at home without kneeling or getting down to the floor? This suggested session stays standing and uses a solid wall for two of the movements. It includes two minutes to ease in, six minutes of small movements with pauses, and two minutes to finish. Nothing is added outside that ten-minute practice clock.
The plan is an original practice suggestion, not a tested treatment or a promise of flexibility, pain relief or weight loss. If these movements are new, learn suitable versions with a qualified instructor first. Anyone with an injury, recent operation, pregnancy-related needs or a condition affecting movement should discuss appropriate activity with their clinician and instructor.
Choose a clear spot beside a solid wall
Before starting the timer, clear enough space to stand hip-width apart, reach an arm to either side and take one small step back. Use a dry, level surface and footing that feels secure. A mat is optional; skip a mat that slides. Keep the sofa behind the clear area rather than using a soft cushion or movable furniture as support.
Use a bare, fixed wall, not a door, radiator, glass panel or shelf. Put your phone where you can hear a timer without turning your neck to watch it. Read the whole sequence first. These setup tasks are preparation, not extra exercise minutes.
The full ten-minute clock
| Time | Suggested practice |
|---|---|
| 0:00–2:00 | Easy standing warm-up, then mountain |
| 2:00–4:00 | Small side reaches: four 30-second cycles |
| 4:00–6:00 | Wall-supported stretch: four 30-second cycles |
| 6:00–8:00 | Shallow supported chair shape: four 30-second cycles |
| 8:00–10:00 | Return to easy standing and settle |
Every rest and change of position fits inside its block. If you need longer, replace some movement time with rest; do not hurry to catch up. Stop the timer if you need to finish early. Ten minutes is a ceiling for this plan, not a completion test.
0:00–2:00: Ease in and find mountain
For the first minute, stand near the wall and make a few small shoulder circles, then gently shift weight from one foot to the other with both feet remaining on the floor. Use light wall contact if useful. Keep the movements unhurried and your breathing comfortable.
For the second minute, stand with feet about hip-width apart, arms relaxed and knees unlocked. This is a simple mountain starting position. Notice where your feet contact the floor. You do not need to pull your shoulders back hard or hold your stomach in. Easier option: remain in this comfortable standing position for both minutes.
2:00–4:00: Small side reaches
Use four cycles of 20 seconds of movement followed by 10 seconds upright with arms down. Alternate right, left, right and left. During a movement interval, raise one arm only as far as comfortable and make a small side reach away from that arm, then return upright slowly. Keep both feet down and avoid twisting or forcing depth.
You may repeat a tiny reach rather than hold a position. If lifting an arm overhead is uncomfortable, keep that hand at your waist and make only a small sideways shift, or stay upright throughout the block. There is no target stretch sensation to chase.
4:00–6:00: A small wall-supported stretch
Turn to the wall during the first interval. Place both palms at about chest height, walk your feet back only a small amount and let your hips move back slightly while keeping knees soft. Keep the back comfortably long and the bend shallow, as the photograph illustrates. Do not try to make your torso horizontal.
Take four 30-second cycles: up to 20 seconds to enter and leave the shape slowly, then 10 seconds standing more upright. The first interval includes placing your hands; the last includes returning to upright. Easier option: keep feet closer to the wall and use almost no bend. If wrists, shoulders or the position feel uncomfortable, stand and rest instead.
6:00–8:00: Shallow supported chair shape
Keep both feet down and hands lightly on the wall. In each 30-second cycle, spend up to 15 seconds slowly bending the knees a little and straightening again, then 15 seconds resting upright. Repeat four times. Think of a very small chair-pose variation, not a deep squat or sitting against the wall. Keep the heels down and breathe normally.
Easier option: soften the knees without lowering, or remain in mountain for the whole block. Avoid pushing your body into a shape simply to match the timer. This is separate from our Warrior II stance lesson; no long lunge or kneeling transition is included.
8:00–10:00: Finish without a floor transition
In the first minute, return to relaxed upright standing, lower your arms and make a few small shoulder movements if wanted. Use the wall while changing position. For the final minute, stand comfortably, keep breathing naturally and decide whether to finish there or sit on a stable chair nearby. No breath holds or special breathing count are required.
When to change the plan or stop
Stop for pain, dizziness, numbness or a feeling of instability. Do not push through symptoms to reach ten minutes. Seek individual advice for persistent or concerning symptoms. A session without kneeling still involves standing, some knee bending and hand contact with a wall; those may not suit every person.
If standing itself is unsuitable, our chair-yoga guide describes a different format to discuss with an instructor. The morning-practice guide is a flexible planning template; this article provides a specific clock and a no-floor constraint.
Sources and scope
NC State's yoga teaching resource describes standing postures including mountain, chair and half forward fold. The smaller supported versions, exercise selection and timing here are editorial suggestions, not a copied university class. NCCIH provides general safety context, including qualified instruction and adapting practice to individual needs. Both sources were checked on 27 October 2026. The photograph depicts an AI-generated adult model practising at home.